 I put the air hoses on top, the heater hoses on the bottom, you can
just see the heater shut off valve under the fender.
I put the air hoses on top, the heater hoses on the bottom, you can
just see the heater shut off valve under the fender.Our Vintage Air "Compac" unit is now installed, I didn't do the underhood part yet as we are installing a new engine. I'll save the underhood install for a winter project.
Below are some tips on how I did it, thanks go to the guys on Pro-Touring.com for providing some pics for ideas.
1. had to space the compac unit away from the firewall about 1.5" this is because the defroster outlets run out of room on top, and the box hits tthe tunnel.
2. I used the bulkhead connector with four fittings in line vertical as far to the right looking inside as I could get, but still have room for a crowfoot wrench, probably 1.5" from the right hand panel the kick panel bolts to.
3. All the control and power wires had to be extended to reach the stock control panel location. I made the wire harness long enough to allow the control panel / dash panel to be lowered to the floor if I need to get back in there again. The power relays are tied up just behind the ash tray area.
4 The control panel has a 4' long bulb which reached just fine, but not much extra. I installed it AFTER the unit was in, and finding the little hole was tough, I hope I got it shoved all the way in!
5 I used the stock defroster vents but cut them short and hot glued the VA defroster outlets to them. I think the stock def vents are shaped better and should work better but needed the VA defroster outlets to provide something to plug the hoses into. The stock defroster vents were held in by push nuts, I broke those removing the vents, so I removed the pins and put a "nutsert"* in the duct and reatached the duct with a screw. You could also use a clip nut on the duct. The screw held the duct more securely and I didn't need anything else to secure it.
6. We have a center dash air outlet, and cut the stock duct that connects to the back of it to a length of about 1.5", then hot glued a shop vac "wet" suction nozzle to it! this worked perfectly! :) Thanks Sears!
7. The outer outlets needed reducing, so I cut about 3" off of them and, you gessed it, hot glued ABS drain pipe to them for hose connections. This stuff was 2.5" but a little small. I think a better choice would have been to get 2.5" glue on ABS drain pipe couplers (sleeves) and glue them in, you need a 2 3/4" OD. I put four gobs of hot glue on the pipe OD to act like a hose barb, the hose wanted to slip off after install since I stretched it out for best air flow, so I wrapped a little tie wire around the hose on just those two outlets, and that worked great.
8, I ran the heater hoses through the fender over the wheelwell, installed the heater flow valve close to the firewall connector with a short hose, then on to the engine. It would be a lot simpler with no bulkead connector.
9, I made a small aluminum duct extension for the drivers side heater outlet flow, otherwise it would have cooked the passenger before the driver got warm, and I will probably be the passenger.
10, I really wanted to hook up some kind of outside air flow source, since the car will be driven some time before we get the air going. I hooked a choke cable up to the RH air door in the kick panel, it had a vaccum actuator attached to it. The cable opens the door and I cut away the factory air cover and trimmed the VA fan cover to allow the air to flow to the fan. This should give the VA a pretty good shot at sucking up outside air. The heater and air hoses get in the way a bit but not too bad.
11. the bulkhead fittings must be tightened before it is installed they don't tighten them much at all as delivered. The aluminum clamps will bend very easily right in the center, use washers to help spread the load or make steel U clamps. Use silicone sealer on the bulkhead, it will help hold it in place and fill any gaps.
12. Another tip is to make the under-dash hoses long and loop them above the coner of the glove box instead of taking the shortest route. It sounds funny but it is actually easier on the hose, allows more flex and less kinking problems. I had to use a 90 and 45 deg fitting where the AC hoses connect to the compac unit, the bulkhead ends are all straight type inside the car ninety deg under the hood.
I am very pleased with the controls and how they work, the air output is great! This was my first experience with an air system so there was a lot to learn and lots of wires to connect but the instructions covered almost everything.
I put the air hoses on top, the heater hoses on the bottom, you can
just see the heater shut off valve under the fender.
I welded in a patch plate, and will finish the firewall when the engine is out. The firewall is VERY flexable and needs something like this to strengthen it. I flanged the firewall in, it was flanged out, I also flanged in the edges of the plate to add stiffness, after welding, I put sealer on the seams from the inside.
At the bottom of the photo is the condenser drain line just above a sport welded reinforcement seam.
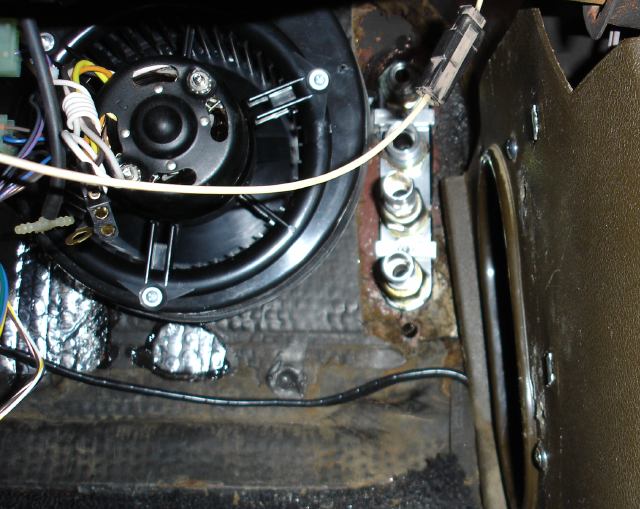 I positioned the unit as far to the right as I could
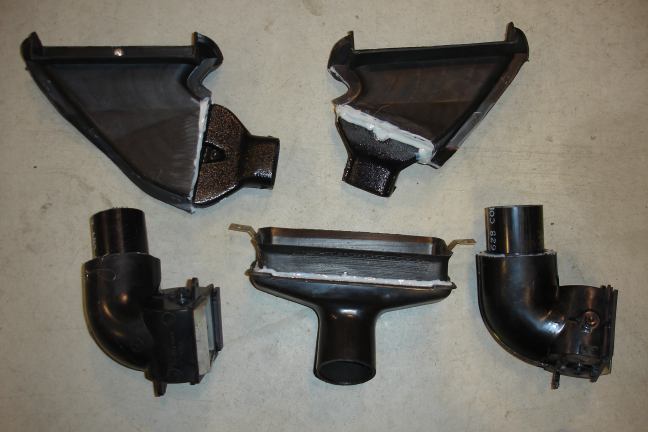 Here are the ducts, hot glue saved my butt! center lower duct is a
sears shop vac nozzle glued to a slice of the factory center dash
ducting.
Here are the ducts, hot glue saved my butt! center lower duct is a
sears shop vac nozzle glued to a slice of the factory center dash
ducting.
 This is the heater duct floor outlet extension, it appears it will
clear the console.
This is the heater duct floor outlet extension, it appears it will
clear the console.
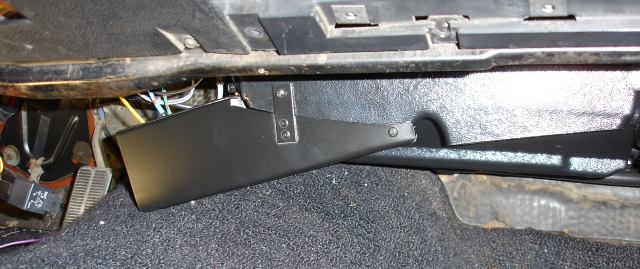
 This shows the factory air kick panel duct, I cut it so air could
reach the VA inlet fan note the hose routing.
This shows the factory air kick panel duct, I cut it so air could
reach the VA inlet fan note the hose routing.
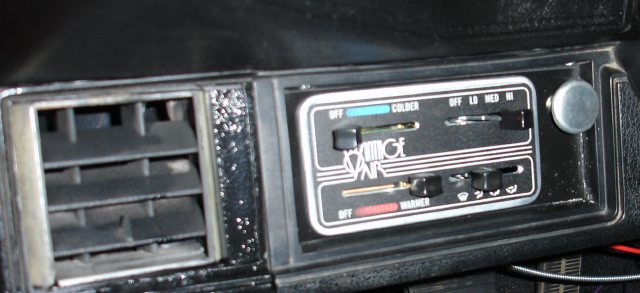 I used a choke cable, (silver knob) to operate the air door in the
passenger kick panel. When I want outside air for vent mode, I pull
the cable. I trimmed the factory cover on the kick panel to direct
fresh air to the vintage air intake, I also trimmed the Vintage Air
cover on the side to recieve this air. I may make a seal for this
connection, but it seems to work pretty well as it is. (sorry about
the fuzzy photo)
I used a choke cable, (silver knob) to operate the air door in the
passenger kick panel. When I want outside air for vent mode, I pull
the cable. I trimmed the factory cover on the kick panel to direct
fresh air to the vintage air intake, I also trimmed the Vintage Air
cover on the side to recieve this air. I may make a seal for this
connection, but it seems to work pretty well as it is. (sorry about
the fuzzy photo)
Another method would be to use the factory air pot to open and close the door, a vaccum solenoid could be triggered by the air conditioning control panel.